
Devices & Inventory
Devices are the heart of GridNMS. Every switch, router, firewall, server, access point, and storage array you monitor lives in your inventory. This page explains how to browse that inventory, add new devices, organize them, and inspect a single device in depth.
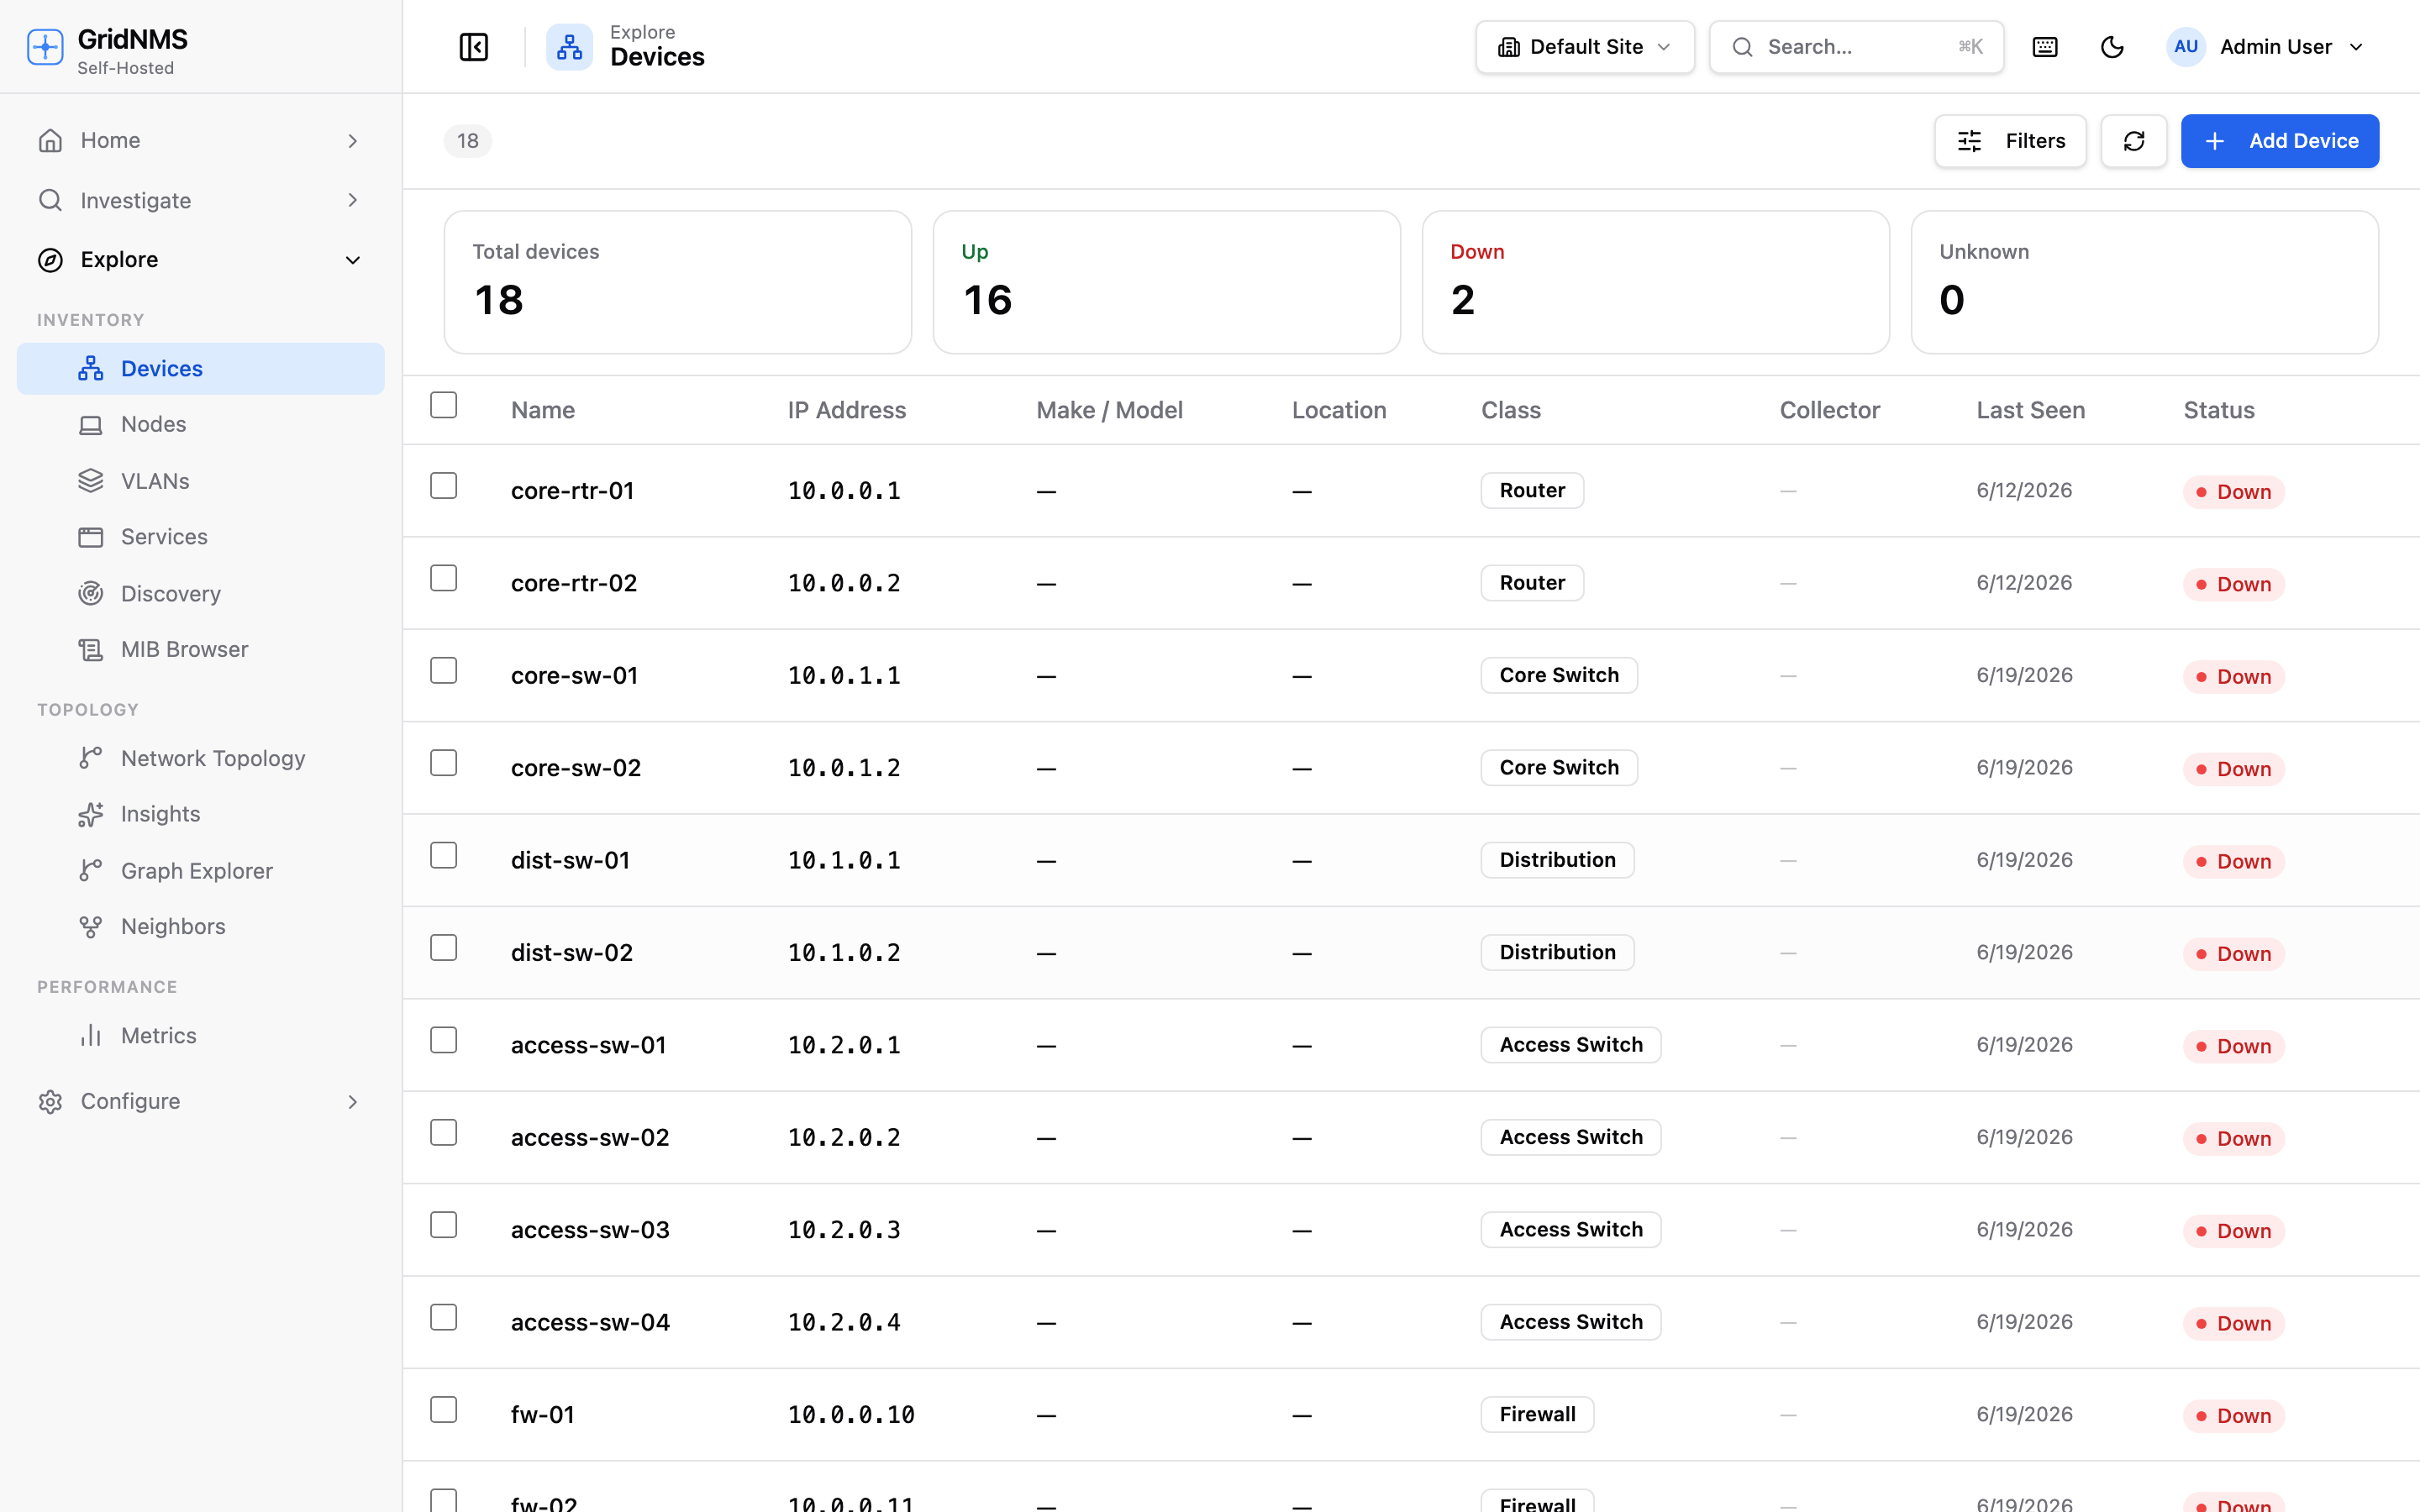 The device list with status badges, filters, and summary cards across the top.
The device list
Section titled “The device list”Open Devices from the main navigation to see everything GridNMS is tracking. At the top, summary cards give you a running count of Total, Up, Down, and Unknown devices — click any card to filter the list to just those devices.
The list itself shows one row per device. Typical columns include:
| Column | Description |
|---|---|
| Status | A colored badge: Up, Down, Unknown, or Unmonitored. |
| Name | The device’s display name (often its hostname). |
| Address | The IP address GridNMS uses to reach it. |
| Class | The device type — Router, Switch, Firewall, Access Point, and so on. |
| Site | Which location the device belongs to. |
| Last seen | When the device was last confirmed reachable. |
Status badges
Section titled “Status badges”- Up — reachable and responding to monitoring.
- Down — failed its reachability check.
- Unknown — state not yet determined (newly added, or its collector is offline).
- Unmonitored — the device is in your inventory but monitoring is turned off, so GridNMS isn’t checking it.
Searching and filtering
Section titled “Searching and filtering”Use the search box to find a device by name or IP. Use the filters to narrow the list by class, site, status, or vendor. Filters and the status cards stack, so you can quickly answer questions like “show me every Down switch in the East datacenter.”
Adding a device
Section titled “Adding a device”- Click Add Device in the top-right of the device list.
- Enter the device’s name and IP address.
- Choose a class (Router, Switch, Firewall, etc.). The class determines which monitoring packs apply and which detail tabs appear.
- Assign the device to a site and, if needed, a specific collector that can reach it.
- Add monitoring credentials (see below).
- Confirm. The device appears in the list and monitoring begins shortly after.
Device classes and the hierarchy
Section titled “Device classes and the hierarchy”Every device belongs to a class that describes what kind of device it is. Classes are arranged in a hierarchy (for example, a specific switch model can sit under a general Switch class), and monitoring settings flow down that hierarchy. Assigning the right class means a device automatically inherits the correct checks and detail tabs without you configuring anything per device.
Sites and collectors
Section titled “Sites and collectors”- Site groups devices by physical location and drives the Site selector used across GridNMS.
- Collector is the GridNMS component that actually reaches out and polls the device. GridNMS can usually pick the right collector automatically based on the device’s network, but you can pin a device to a specific one if needed. See Collectors for how this works.
Monitoring credentials
Section titled “Monitoring credentials”To poll a device for detailed metrics, GridNMS needs credentials:
- SNMP — a community string (v2c) or username/auth/privacy settings (v3), used for interface counters, CPU, memory, and other metrics.
- SSH — a username with either a password or a private key, used for command-based collection on devices that support it. Paste a PEM-encoded key into the Private Key (PEM) box to use key-based login, leave it blank to use the password, or let GridNMS create the key pair for you. Appliances whose SSH login only answers interactive prompts are handled automatically; you don’t need to configure anything for them.
You can set credentials globally and override them per device when a particular device uses a different community string or login. Open the device, go to its settings, and enter the override there — it takes precedence over the global default for that one device.
Key-based SSH login
Section titled “Key-based SSH login”Key-based login is usually the better choice for SSH collection: nothing has to store a reusable password for the device, and the key can be restricted to read-only use.
You can paste a key you already have, or have GridNMS make one:
- Open the device and select Configure to open Collection & Credential Overrides.
- Under Credentials → SSH, select Generate a key for me.
- GridNMS creates a new key pair, keeps the private half in its encrypted credential store, and shows you the matching public key. Copy it — this is the only time it’s shown. If you lose it, generate a new one.
- Add that public key to the device’s allowed logins and save the device’s SSH username alongside it.
The private half is never displayed and never leaves GridNMS. Generating a new key does not remove the old one from the device — if you’re replacing a key because it may have been exposed, delete the old key’s entry on the device too.
The account GridNMS logs in as
Section titled “The account GridNMS logs in as”SSH collection only ever reads; it never changes anything on the device. Give it a dedicated account rather than reusing an administrator login, and set that account up so it can do no more than it needs:
- No password login — lock or disable the account’s password so the key is the only way in.
- No administrative rights. GridNMS’s built-in Linux, macOS and Windows
collection reads values any ordinary logged-in account can already see, so the
account needs no
sudo, no admin group, and no elevation. - Restrict the key itself. Most SSH servers let you attach restrictions to a single key — no interactive terminal, and no port, agent or X11 forwarding. Collection issues one-off commands and needs none of those.
- Keep a working shell. A “no login” shell such as
nologinorfalserefuses every command, including the short non-interactive ones collection runs, so the account would fail to collect anything. The restrictions above are what limit the account, not the shell.
On macOS and Windows, SSH is off by default — turn on Remote Login (macOS) or install the OpenSSH server feature (Windows) before the device will answer.
Set up the account automatically
Section titled “Set up the account automatically”Rather than creating and locking down that account by hand, copy the script below for the device’s operating system, save it on the device, and run it there with the public key GridNMS gave you. It creates the account, disables password login, installs the key with the restrictions described above, and prints a short summary when it’s done. Re-running it later — to rotate the key, for example — updates the existing account instead of failing.
Save as provision-ro-linux.sh, then run as root with the public key GridNMS gave you:
sudo ./provision-ro-linux.sh "ssh-ed25519 AAAA... gridnms-device-42"#!/usr/bin/env bash# provision-ro-linux.sh — read-only account provisioning for GridNMS agentless# SSH monitoring.## Creates a dedicated, non-privileged system account this Linux host's SSH# collection will authenticate as. Run this on the TARGET host you want# GridNMS to interrogate over SSH — not on the collector or the server.## Usage:# sudo ./provision-ro-linux.sh "ssh-ed25519 AAAA... gridnms-device-42"# sudo ./provision-ro-linux.sh --user my-ro-user "ssh-ed25519 AAAA..."## The public key argument is exactly what GridNMS gives you after# Device → Configure → SSH → "Generate a key for me" (or your own public key,# if you configured a private key manually instead).## What this does, and why:# - Creates the account with a REAL shell (default: /bin/bash), never# /usr/sbin/nologin or /bin/false. This is intentional, not an oversight:# those "no-login" shells refuse EVERY command the SSH server tries to run# on the account's behalf, including the one-shot, non-interactive# commands GridNMS's SSH collection issues (`cat /proc/loadavg`, `df -kP`,# …) — not just an interactive login. A read-only account still needs a# working shell to run those; the restriction that matters is everything# else below, not the shell.# - Locks the password (`passwd -l`) — no password login is possible at all.# - Installs ONLY the public key you provide into a dedicated# ~/.ssh/authorized_keys, with SSH's own key-level restrictions# (no-pty, no-port-forwarding, no-X11-forwarding, no-agent-forwarding) —# the key can run a command, but never open an interactive session or# tunnel through the host.# - Grants NO sudo/elevated rights. GridNMS's current Linux SSH pack# (os_release, hw identity via /sys/class/dmi/id/*, /proc/*, df) reads# files that are world-readable on every mainstream distro by default —# verified against the shipped pack's own command list. There is# currently nothing this account needs elevated access for. If a FUTURE# collector needs one specific privileged command, add a narrowly-scoped# sudoers NOPASSWD entry for that exact command at that time — never a# blanket sudo grant "just in case" (see the commented example at the# bottom of this file).# - Is idempotent: re-running it (e.g. to rotate the key) updates the# existing account instead of failing on "user already exists".## This script does NOT install or download anything at runtime (no# curl/wget/apt/yum calls) — it only uses standard tools already on the box# (useradd/usermod, passwd, install, id).set -euo pipefail
PROG="$(basename "$0")"GRIDNMS_USER="gridnms-ro"HOME_DIR=""PUBKEY=""
usage() { cat >&2 <<EOFUsage: sudo $PROG [--user NAME] [--home DIR] "<ssh public key line>"
--user NAME account name to create/update (default: gridnms-ro) --home DIR home directory for the account (default: /var/lib/<user>)EOF exit 1}
while [ $# -gt 0 ]; do case "$1" in --user) GRIDNMS_USER="${2:?--user requires a value}"; shift 2 ;; --home) HOME_DIR="${2:?--home requires a value}"; shift 2 ;; -h|--help) usage ;; --) shift; break ;; -*) echo "$PROG: unknown option: $1" >&2; usage ;; *) break ;; esacdone
PUBKEY="${1:-}"if [ -z "$PUBKEY" ]; then echo "$PROG: missing required <ssh public key line> argument" >&2 usageficase "$PUBKEY" in *$'\n'*|*$'\r'*) echo "$PROG: the public key argument contains a newline or carriage return —" >&2 echo " refusing to use it. A multi-line value would write a SECOND, unrestricted" >&2 echo " authorized_keys entry (only the first line gets the no-pty/no-forwarding" >&2 echo " restrictions below). Paste exactly one key line, with no embedded newlines." >&2 exit 1 ;;esaccase "$PUBKEY" in ssh-ed25519\ *|ssh-rsa\ *|ecdsa-sha2-*\ *) ;; *) echo "$PROG: that doesn't look like an SSH public key line (expected it to start with" >&2 echo " ssh-ed25519 / ssh-rsa / ecdsa-sha2-...) — paste the PUBLIC key GridNMS gave you," >&2 echo " never a private key." >&2 exit 1 ;;esac
if [ -z "$HOME_DIR" ]; then HOME_DIR="/var/lib/${GRIDNMS_USER}"fi
if [ "$(id -u)" != "0" ]; then echo "$PROG: must be run as root (sudo)" >&2 exit 1fi
if id "$GRIDNMS_USER" >/dev/null 2>&1; then echo "== ${GRIDNMS_USER} already exists — updating its key and lockdown, not recreating it =="else echo "== creating system account ${GRIDNMS_USER} ==" useradd --system --no-create-home --home-dir "$HOME_DIR" --shell /bin/bash "$GRIDNMS_USER"fi
# No password, ever — key-only. `passwd -l` on an account with no password set# yet is a harmless no-op (there's nothing to lock beyond marking it locked).passwd -l "$GRIDNMS_USER" >/dev/null
mkdir -p "${HOME_DIR}/.ssh"chmod 700 "$HOME_DIR" "${HOME_DIR}/.ssh"
# The key-level restriction options are the actual boundary here — they hold# even if this account's shell or filesystem posture ever loosens by mistake.{ printf 'no-pty,no-port-forwarding,no-X11-forwarding,no-agent-forwarding %s\n' "$PUBKEY"} > "${HOME_DIR}/.ssh/authorized_keys"chmod 600 "${HOME_DIR}/.ssh/authorized_keys"chown -R "${GRIDNMS_USER}:${GRIDNMS_USER}" "$HOME_DIR" 2>/dev/null || \ chown -R "${GRIDNMS_USER}" "$HOME_DIR"
echo "== done =="echo "Account: ${GRIDNMS_USER}"echo "Home: ${HOME_DIR}"echo "Auth: SSH key only (password login disabled)"echo "Privileges: none (no sudo, no group membership beyond its own)"echoecho "In GridNMS, set this device's SSH username to '${GRIDNMS_USER}' — the private key"echo "half already lives on the server from when the public key above was generated/pasted."
# ── If a future collector genuinely needs one privileged command ───────────# Add a narrowly-scoped sudoers entry for THAT command only, e.g.:# echo '${GRIDNMS_USER} ALL=(root) NOPASSWD: /usr/sbin/dmidecode -s system-manufacturer' \# > /etc/sudoers.d/gridnms-ro# chmod 440 /etc/sudoers.d/gridnms-ro# Never grant blanket sudo, and never grant a command with arguments the# account itself can influence (a bare `NOPASSWD: /usr/sbin/dmidecode` with no# fixed arguments is enough to read arbitrary hardware info this account has# no other reason to have).Save as provision-ro-macos.sh, then run as root with the public key GridNMS gave you:
sudo ./provision-ro-macos.sh "ssh-ed25519 AAAA... gridnms-device-42"Add --enable-remote-login if this Mac doesn’t already have Remote Login turned on
(GridNMS can’t reach it over SSH otherwise):
sudo ./provision-ro-macos.sh --enable-remote-login "ssh-ed25519 AAAA..."#!/usr/bin/env bash# provision-ro-macos.sh — read-only account provisioning for GridNMS agentless# SSH monitoring on macOS.## Creates a dedicated, non-admin local account this Mac's SSH collection will# authenticate as. Run this on the TARGET Mac you want GridNMS to interrogate# over SSH — not on the collector or the server.## Usage:# sudo ./provision-ro-macos.sh "ssh-ed25519 AAAA... gridnms-device-42"# sudo ./provision-ro-macos.sh --enable-remote-login "ssh-ed25519 AAAA..."## The public key argument is exactly what GridNMS gave you after# Device → Configure → SSH → "Generate a key for me" (or your own public key,# if you configured a private key manually instead).## What this does, and why:# - Creates the account via `dscl` (macOS's own Directory Service tool —# there is no `useradd` on macOS) as a STANDARD, non-admin user: it is# never added to the `admin` group, so it can never sudo or change# system settings, only run the read-only commands GridNMS's macOS SSH# pack issues (sw_vers, sysctl, vm_stat, df, netstat -ibn — every one of# these is readable by any logged-in user on stock macOS, no elevation).# - Disables password login: `dscl` sets the account's Password field to# `*`, the standard macOS convention for "this account cannot# authenticate with a password" (the same sentinel legacy BSD systems# use) — key-only from here.# - Installs ONLY the public key you provide into a dedicated# ~/.ssh/authorized_keys, with SSH's own key-level restrictions# (no-pty, no-port-forwarding, no-X11-forwarding, no-agent-forwarding).# - Does NOT silently turn on Remote Login (SSH) for you — macOS ships it# OFF by default, and flipping a system-wide setting is a bigger,# security-relevant action than creating an account. Pass# --enable-remote-login if you want this script to also run# `systemsetup -setremotelogin on`; otherwise it prints what to do and# leaves your current setting untouched.# - Restricts WHO may use Remote Login to this one account via the# `com.apple.access_ssh` group (macOS's own SSH access-control group) —# so enabling Remote Login for this account doesn't also open it to# every other account on the Mac.# - Is idempotent: re-running it (e.g. to rotate the key) updates the# existing account instead of failing on "already exists".## This script does NOT install or download anything at runtime — only# standard macOS tools already on the box (dscl, dseditgroup, systemsetup).set -euo pipefail
PROG="$(basename "$0")"GRIDNMS_USER="gridnms-ro"HOME_DIR=""ENABLE_REMOTE_LOGIN=0PUBKEY=""
usage() { cat >&2 <<EOFUsage: sudo $PROG [--user NAME] [--home DIR] [--enable-remote-login] "<ssh public key line>"
--user NAME account name to create/update (default: gridnms-ro) --home DIR home directory for the account (default: /var/gridnms-ro) --enable-remote-login also turn on macOS Remote Login (SSH) — off by default; without this flag the script only tells you it's off and leaves it aloneEOF exit 1}
while [ $# -gt 0 ]; do case "$1" in --user) GRIDNMS_USER="${2:?--user requires a value}"; shift 2 ;; --home) HOME_DIR="${2:?--home requires a value}"; shift 2 ;; --enable-remote-login) ENABLE_REMOTE_LOGIN=1; shift ;; -h|--help) usage ;; --) shift; break ;; -*) echo "$PROG: unknown option: $1" >&2; usage ;; *) break ;; esacdone
PUBKEY="${1:-}"if [ -z "$PUBKEY" ]; then echo "$PROG: missing required <ssh public key line> argument" >&2 usageficase "$PUBKEY" in *$'\n'*|*$'\r'*) echo "$PROG: the public key argument contains a newline or carriage return —" >&2 echo " refusing to use it. A multi-line value would write a SECOND, unrestricted" >&2 echo " authorized_keys entry (only the first line gets the no-pty/no-forwarding" >&2 echo " restrictions below). Paste exactly one key line, with no embedded newlines." >&2 exit 1 ;;esaccase "$PUBKEY" in ssh-ed25519\ *|ssh-rsa\ *|ecdsa-sha2-*\ *) ;; *) echo "$PROG: that doesn't look like an SSH public key line (expected it to start with" >&2 echo " ssh-ed25519 / ssh-rsa / ecdsa-sha2-...) — paste the PUBLIC key GridNMS gave you," >&2 echo " never a private key." >&2 exit 1 ;;esac
if [ -z "$HOME_DIR" ]; then HOME_DIR="/var/${GRIDNMS_USER}"fi
if [ "$(id -u)" != "0" ]; then echo "$PROG: must be run as root (sudo)" >&2 exit 1fi
USER_PATH="/Users/${GRIDNMS_USER}"
if dscl . -read "$USER_PATH" >/dev/null 2>&1; then echo "== ${GRIDNMS_USER} already exists — updating its key and lockdown, not recreating it =="else echo "== creating standard (non-admin) account ${GRIDNMS_USER} ==" # UniqueID: pick the next free id at or above 500 (macOS reserves <500 for # system accounts; 500+ is the conventional "regular user, but not shown # on the login screen when hidden" range). next_uid=500 while dscl . -search /Users UniqueID "$next_uid" 2>/dev/null | grep -q .; do next_uid=$((next_uid + 1)) done dscl . -create "$USER_PATH" dscl . -create "$USER_PATH" UserShell /bin/bash dscl . -create "$USER_PATH" RealName "GridNMS Read-Only" dscl . -create "$USER_PATH" UniqueID "$next_uid" dscl . -create "$USER_PATH" PrimaryGroupID 20 # staff — NOT 80 (admin) dscl . -create "$USER_PATH" NFSHomeDirectory "$HOME_DIR"fi
# `*` is the documented macOS sentinel for "no password can ever match" —# never a real string, and never the empty string (empty means "no password# required", the opposite of what we want).dscl . -create "$USER_PATH" Password "*"
mkdir -p "${HOME_DIR}/.ssh"chmod 700 "$HOME_DIR" "${HOME_DIR}/.ssh"{ printf 'no-pty,no-port-forwarding,no-X11-forwarding,no-agent-forwarding %s\n' "$PUBKEY"} > "${HOME_DIR}/.ssh/authorized_keys"chmod 600 "${HOME_DIR}/.ssh/authorized_keys"chown -R "${GRIDNMS_USER}:staff" "$HOME_DIR"
# Restrict Remote Login access to exactly this account, regardless of whether# Remote Login is currently on or off — so turning it on later (by this# script or by hand) never accidentally opens it to every account.if ! dscl . -read /Groups/com.apple.access_ssh >/dev/null 2>&1; then dseditgroup -o create -q com.apple.access_sshfidseditgroup -o edit -a "$GRIDNMS_USER" -t user com.apple.access_ssh
remote_login_status="$(systemsetup -getremotelogin 2>/dev/null || echo 'unknown')"if [ "$ENABLE_REMOTE_LOGIN" = "1" ]; then systemsetup -setremotelogin on >/dev/null echo "Remote Login: enabled (--enable-remote-login was passed)"elif printf '%s' "$remote_login_status" | grep -qi 'off'; then echo echo "NOTE: Remote Login (SSH) is currently OFF on this Mac, so GridNMS cannot" echo "reach it yet. Turn it on with:" echo " sudo systemsetup -setremotelogin on" echo "or re-run this script with --enable-remote-login."fi
echo "== done =="echo "Account: ${GRIDNMS_USER} (standard user, not an admin)"echo "Home: ${HOME_DIR}"echo "Auth: SSH key only (password login disabled)"echo "SSH access: restricted to this account via the com.apple.access_ssh group"echoecho "In GridNMS, set this device's SSH username to '${GRIDNMS_USER}' — the private key"echo "half already lives on the server from when the public key above was generated/pasted."Save as provision-ro-windows.ps1, then run from an elevated (Run as Administrator)
PowerShell prompt with the public key GridNMS gave you:
.\provision-ro-windows.ps1 -PublicKey "ssh-ed25519 AAAA... gridnms-device-42"# provision-ro-windows.ps1 — read-only account provisioning for GridNMS# agentless SSH monitoring on Windows.## Creates a dedicated, non-admin local account this Windows host's SSH# collection will authenticate as. Run this ON THE TARGET Windows host you# want GridNMS to interrogate over SSH — not on the collector or the server —# from an elevated (Run as Administrator) PowerShell prompt.## Usage:# .\provision-ro-windows.ps1 -PublicKey "ssh-ed25519 AAAA... gridnms-device-42"# .\provision-ro-windows.ps1 -PublicKey "ssh-ed25519 AAAA..." -UserName my-ro-user## The public key argument is exactly what GridNMS gave you after# Device -> Configure -> SSH -> "Generate a key for me" (or your own public# key, if you configured a private key manually instead).## What this does, and why:# - Creates the account as a STANDARD, non-admin local user — it is never# added to the Administrators group, only to the built-in Users group,# so it can never elevate. GridNMS's Windows SSH pack (systeminfo, wmic# CPU/memory/disk queries) reads WMI classes that are readable by any# authenticated user on stock Windows, with no elevation needed.# - Creates it with NO password (`-NoPassword`). Windows blocks blank-# password network logon by default (the `LimitBlankPasswordUse` policy),# so this account is effectively unreachable by password over the# network either way — key-only via OpenSSH from here.# - Does NOT install or enable the OpenSSH Server feature for you — that is# a system-wide change bigger than creating an account, and Windows ships# it optional. The script CHECKS whether it's present/running and tells# you exactly what to run if it isn't; it never silently enables it.# - Writes ONLY the public key you provide into a dedicated# `.ssh\authorized_keys` under the account's profile, and sets the exact# NTFS permissions Windows OpenSSH itself requires (owner + SYSTEM +# Administrators only) — a looser ACL makes Windows OpenSSH silently# IGNORE the file, which is the single most common reason this kind of# setup "doesn't work" with no error anywhere.# - Is idempotent: re-running it (e.g. to rotate the key) updates the# existing account instead of failing on "already exists".## This script does NOT install or download anything at runtime — only# built-in Windows/PowerShell cmdlets already on the box.
[CmdletBinding()]param( [Parameter(Mandatory = $true)] [string]$PublicKey,
[string]$UserName = "gridnms-ro")
$ErrorActionPreference = "Stop"
if ($PublicKey -match "`r" -or $PublicKey -match "`n") { Write-Error "The public key argument contains a newline or carriage return - refusing to use it. A multi-line value would write a SECOND, unrestricted authorized_keys entry (only the first line gets the no-pty/no-forwarding restrictions below). Paste exactly one key line, with no embedded newlines." exit 1}
if ($PublicKey -notmatch '^(ssh-ed25519|ssh-rsa|ecdsa-sha2-\S+)\s') { Write-Error "That doesn't look like an SSH public key line (expected it to start with ssh-ed25519 / ssh-rsa / ecdsa-sha2-...) — paste the PUBLIC key GridNMS gave you, never a private key." exit 1}
$currentIdentity = [Security.Principal.WindowsIdentity]::GetCurrent()$currentPrincipal = New-Object Security.Principal.WindowsPrincipal($currentIdentity)if (-not $currentPrincipal.IsInRole([Security.Principal.WindowsBuiltInRole]::Administrator)) { Write-Error "Must be run from an elevated (Run as Administrator) PowerShell prompt." exit 1}
$existing = Get-LocalUser -Name $UserName -ErrorAction SilentlyContinueif ($existing) { Write-Host "== $UserName already exists — updating its key, not recreating it =="} else { Write-Host "== creating standard (non-admin) local user $UserName ==" New-LocalUser -Name $UserName -NoPassword -AccountNeverExpires -PasswordNeverExpires ` -Description "GridNMS read-only SSH collection account" | Out-Null # Explicit, not assumed: a brand-new local user lands in Users by default, # but this makes the intent unambiguous and self-documenting, and is a # harmless no-op if it's already a member. Add-LocalGroupMember -Group "Users" -Member $UserName -ErrorAction SilentlyContinue | Out-Null}
# Never let this account be an Administrator, regardless of prior state.$isAdmin = (Get-LocalGroupMember -Group "Administrators" -ErrorAction SilentlyContinue | Where-Object { $_.Name -like "*\$UserName" }) -ne $nullif ($isAdmin) { Remove-LocalGroupMember -Group "Administrators" -Member $UserName Write-Warning "$UserName was in Administrators — removed. This account must never be an admin."}
# Resolve (and, on first creation, force-create by logon) the profile# directory so .ssh\authorized_keys lands somewhere Windows OpenSSH will# actually read. A brand-new local user has no profile directory until its# first logon, so derive the conventional path directly instead of waiting# for one.$profileDir = "C:\Users\$UserName"$sshDir = Join-Path $profileDir ".ssh"New-Item -ItemType Directory -Path $sshDir -Force | Out-Null
$restrictedLine = "no-pty,no-port-forwarding,no-X11-forwarding,no-agent-forwarding $PublicKey"$authorizedKeysPath = Join-Path $sshDir "authorized_keys"Set-Content -Path $authorizedKeysPath -Value $restrictedLine -Encoding ascii -NoNewlineAdd-Content -Path $authorizedKeysPath -Value "`n" -Encoding ascii
# Windows OpenSSH's own hard requirement: authorized_keys must be readable# ONLY by the owning account, SYSTEM, and Administrators — anything looser# (e.g. inherited "Users" read access) makes sshd silently refuse to honour# the file, with no error in any log an operator would think to check first.icacls $sshDir /inheritance:r | Out-Nullicacls $sshDir /grant "${UserName}:(OI)(CI)F" | Out-Nullicacls $sshDir /grant "SYSTEM:(OI)(CI)F" | Out-Nullicacls $sshDir /grant "Administrators:(OI)(CI)F" | Out-Nullicacls $authorizedKeysPath /inheritance:r | Out-Nullicacls $authorizedKeysPath /grant "${UserName}:F" | Out-Nullicacls $authorizedKeysPath /grant "SYSTEM:F" | Out-Nullicacls $authorizedKeysPath /grant "Administrators:F" | Out-Null
$sshdService = Get-Service -Name sshd -ErrorAction SilentlyContinueWrite-Host "== done =="Write-Host "Account: $UserName (standard user, not an admin)"Write-Host "Home: $profileDir"Write-Host "Auth: SSH key only (no password set)"if (-not $sshdService) { Write-Host "" Write-Warning "OpenSSH Server does not appear to be installed on this host. Install it with:" Write-Warning " Add-WindowsCapability -Online -Name OpenSSH.Server~~~~0.0.1.0" Write-Warning " Start-Service sshd; Set-Service -Name sshd -StartupType Automatic"} elseif ($sshdService.Status -ne "Running") { Write-Host "" Write-Warning "OpenSSH Server is installed but not running. Start it with:" Write-Warning " Start-Service sshd"} else { Write-Host "OpenSSH Server: installed and running"}Write-Host ""Write-Host "In GridNMS, set this device's SSH username to '$UserName' — the private key"Write-Host "half already lives on the server from when the public key above was generated/pasted."The Monitor toggle
Section titled “The Monitor toggle”Each device has a Monitor on/off toggle. Turn it off to stop all checks for a device — useful for gear that’s being decommissioned, lab equipment, or a device you don’t want generating alerts. While monitoring is off, the device shows the Unmonitored badge and raises no events. Turn it back on to resume.
The device detail page
Section titled “The device detail page”Click any device in the list to open its detail page — a focused view of everything GridNMS knows about that one device.
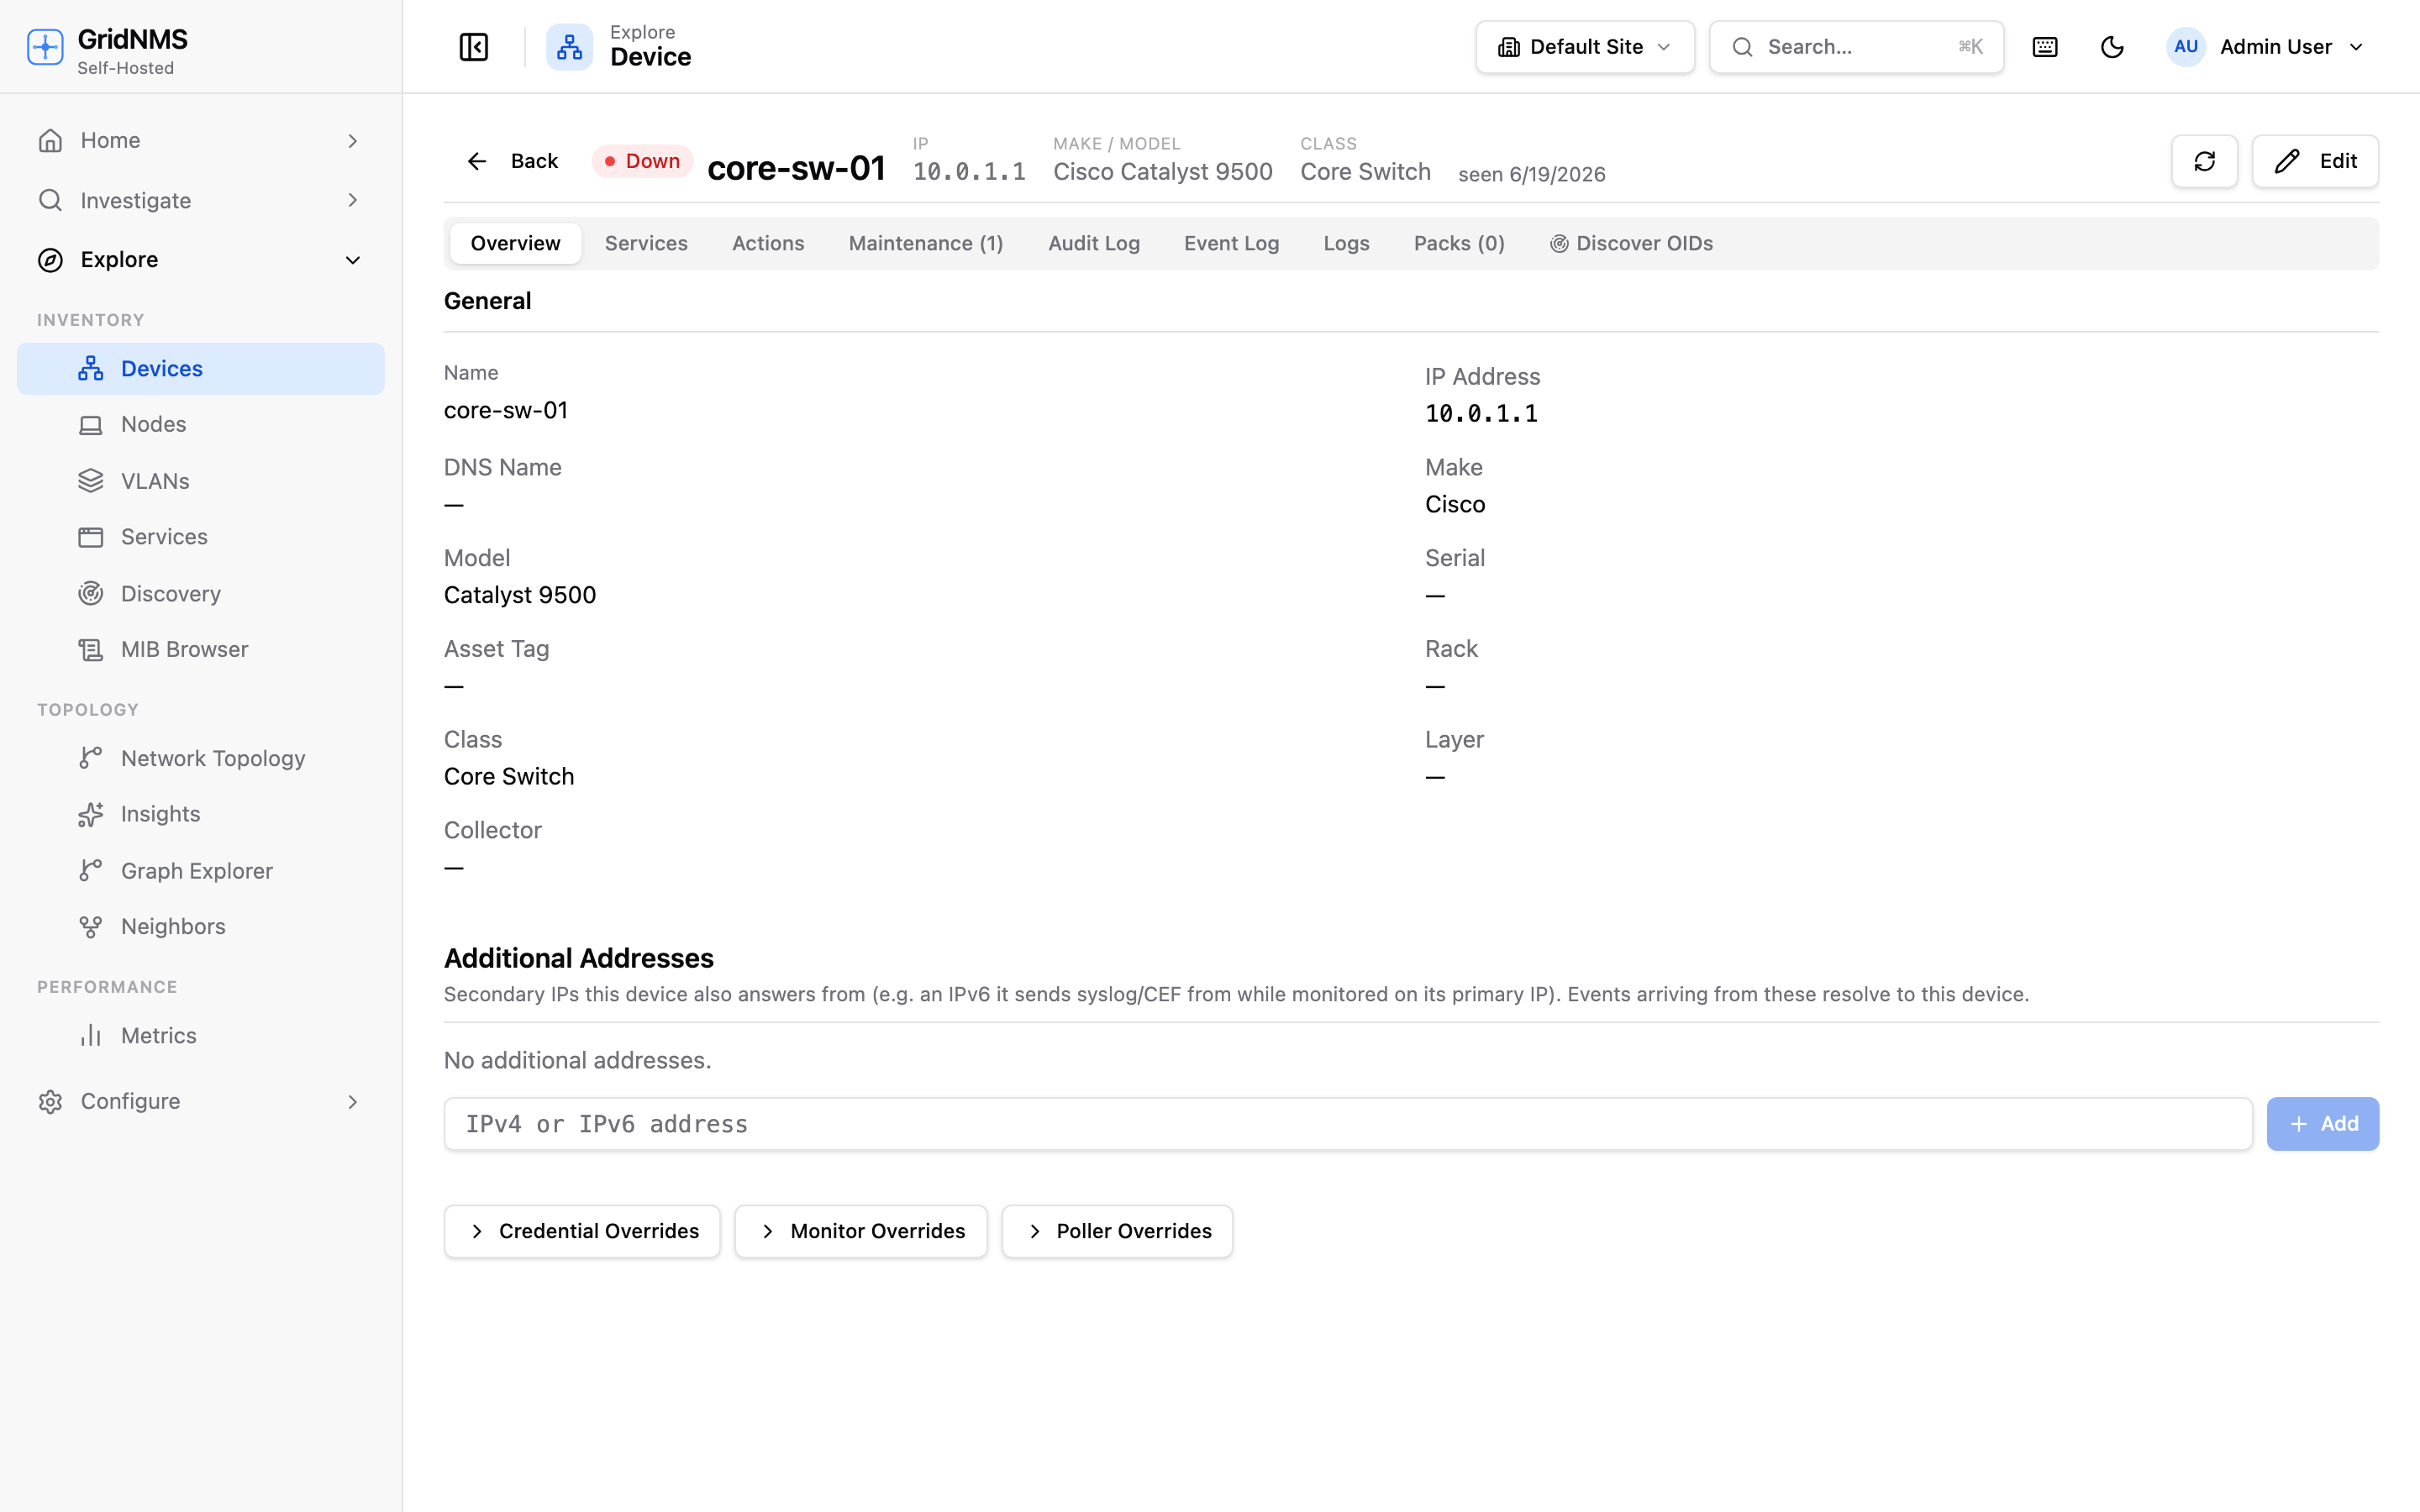 The device detail page, with tabs for overview, system stats, interfaces, events, and more.
The detail page is organized into tabs. Which tabs appear depends on the device’s class and the monitoring packs that apply to it, but you’ll commonly see:
| Tab | What it shows |
|---|---|
| Overview | Key facts — status, address, class, site, uptime, vendor/model, operating system, and current health summary. Collection and credential settings for this device open from the bottom of this tab, alongside a Reachability Alerts switch for silencing up/down alerts from a noisy device without hiding its events. |
| System Stats | Every system chart for the device in one place — CPU, memory, load, disk, temperature, and anything else its packs report — with a Chart range picker. Device metric thresholds are set here, next to the charts they apply to. |
| Interfaces | Every port on the device with its status, speed, and live traffic. You can set per-interface bandwidth thresholds here. |
| Neighbors | Directly connected neighbors the device reports, the basis of the topology map. |
| Applications | Services found listening on the device. |
| Actions | Run a check against the device on demand — poll it, scan it, or probe it — and see the result of recent runs. You can also run a single collector from one of its packs (for example Run Config Backup) rather than a full cycle, which is the quickest way to test a change you just made. |
| Maintenance | Maintenance windows scheduled for this device. |
| Events | The history of events for this device. |
| Logs | Raw log messages received from or about this device. |
| Config | Saved configuration backups captured over time, so you can see what changed and when. |
| Packs | The monitoring packs applied to this device, and any collection you have turned off for it. |
| Discover OIDs | Walk the device over SNMP to see what it actually exposes — useful when building a pack. |
A tab that counts things shows the count in its label, so you can see there are twelve interfaces without opening the tab. Specialized device classes add their own tabs as well (for example, an access point might show connected clients, and a storage array might show volume capacity).
Silencing a noisy device
Section titled “Silencing a noisy device”If one device flaps up and down in a way you’ve decided not to be paged about, turn off Reachability Alerts on its Overview tab rather than turning off its monitoring. The up/down events — and everything that depends on them — keep being recorded; only the email or page stops, and only for reachability. Every other alert about that device still reaches you. See Notifications.
Bulk actions
Section titled “Bulk actions”When you need to act on many devices at once, select multiple rows in the device list using the checkboxes. A bulk-action bar appears, letting you:
- Turn monitoring on or off for all selected devices.
- Reassign them to a different site or collector.
- Change their class.
- Delete them from inventory.
This is the fastest way to onboard or reorganize a batch of devices after a discovery scan.
Where to go next
Section titled “Where to go next”- Find devices automatically with Network Discovery.
- See what your network gear has spotted nearby that isn’t in your inventory yet on the Hosts page.
- See how devices connect on the Graph Explorer page.
- Learn what GridNMS checks and how often in Monitoring.
docs built 2026-09-26 · 195c6d00